Introduction
Paradime is an AI-powered workspace that consolidates the entire analytics workflow, eliminating tool sprawl and fragile local setups. With features like the Code IDE, DinoAI co-pilot, and Paradime Bolt orchestration system, teams achieve significant productivity gains and reductions in warehouse spending. From column-level lineage to real-time monitoring, Paradime provides everything analytics teams need to develop, test, and deploy dbt™ projects efficiently.
Prerequisites for Creating a Paradime Workspace
Before diving into workspace setup, ensure you have the necessary access and credentials in place. Creating a Paradime workspace typically takes about 10 minutes when you have all prerequisites ready.
Admin Access Requirements
You'll need an admin role in the Paradime platform to create and configure workspaces. Additionally, repository admin access is essential for adding deploy keys to your Git repository, which allows Paradime to interact with your code securely. Finally, ensure you have the proper access credentials for your data warehouse, including authentication details and necessary permissions.
Supported Integrations
Paradime integrates seamlessly with major Git providers including GitHub, GitLab, Azure Repos, and Bitbucket. For data warehouses, the platform supports Snowflake, BigQuery, Redshift, and Databricks, providing flexibility for teams using different cloud data platforms.
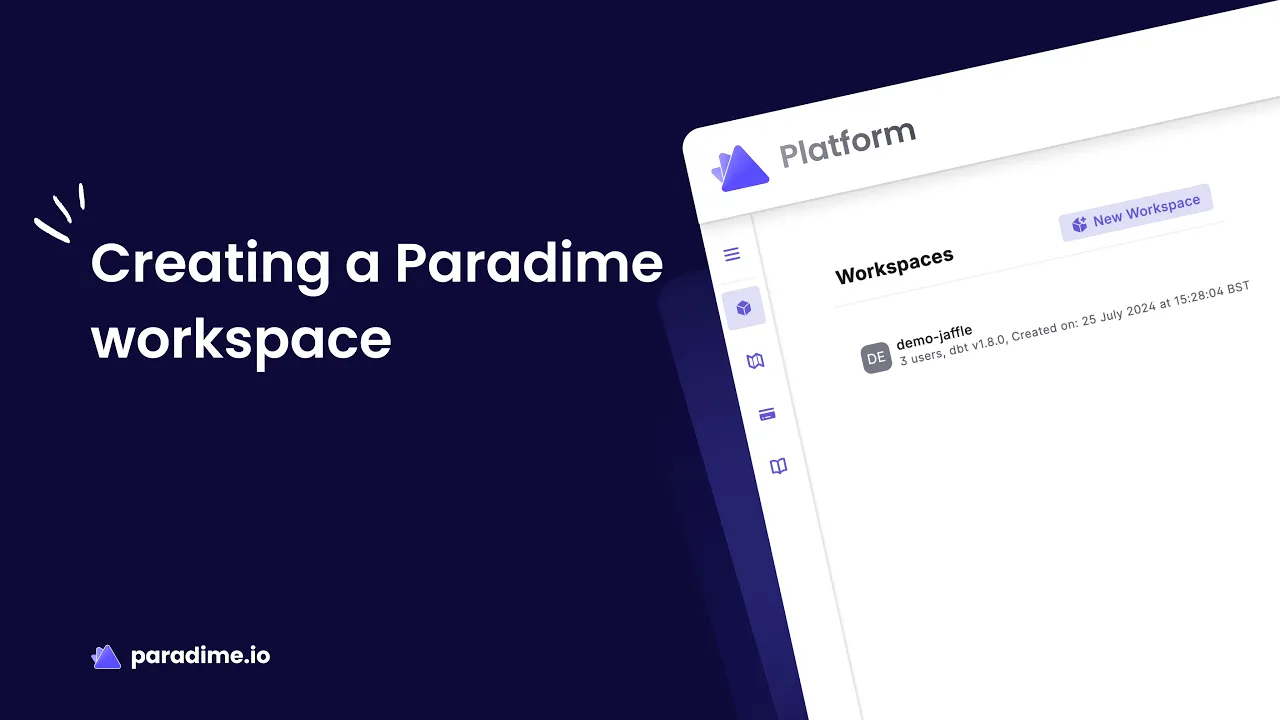
Step 1: Creating Your Paradime Workspace
Navigate to Platform Settings
Access the workspace management interface by navigating to your Platform settings. Here you'll find all workspace controls and configuration options. Click the "New Workspace" button to begin the setup process.
Configure Workspace Details
Provide a descriptive name for your workspace that clearly indicates its purpose or team. Consider your organization's naming conventions—many teams use formats like "project-environment" to maintain clarity across multiple workspaces.
Next, choose the workspace visibility settings. You can determine whether other people in your organization can access the workspace without an invite. This option assigns them a business user role by default, making the workspace visible in their workspaces list even before they're formally added. This feature is particularly useful for organizations prioritizing transparency and self-service access to analytics resources.
Workspace Organization Best Practices
When planning your workspace structure, consider your team's workflow and environment strategy. Many successful teams create separate workspaces for development, staging, and production environments. This separation ensures clean boundaries between experimental work and production pipelines.
Use clear, consistent naming conventions that your entire team can understand at a glance. Consider including the project name, environment type, and perhaps the team name in larger organizations. This approach scales well as your analytics infrastructure grows.
Step 2: Connecting Your Git Repository
Repository Setup Options
Paradime offers flexibility in how you connect your repository. You can connect an empty repository if you're starting a new dbt™ project from scratch, or link an existing repository containing your current dbt™ project. This flexibility makes migration from other platforms straightforward.
Adding the SSH Deploy Key
When you add a repository's SSH URI to Paradime, the platform automatically generates a deploy key. This cryptographic key is essential for secure communication between Paradime and your repository.
You'll need to add this deploy key to your Git repository settings. Only repository admins can perform this action, which is why admin access is a prerequisite. The deploy key grants Paradime write access to your repository, enabling users to create commits and push branches directly from the Paradime IDE. This seamless integration eliminates the need to switch between tools during development.
Supported Git Platforms
Whether your team uses GitHub, GitLab, Azure Repos, or Bitbucket, Paradime's integration process follows a similar pattern. Each platform has its own interface for managing deploy keys, typically found in the repository's security or settings section. Once added, the key enables full version control functionality within Paradime's development environment.
Step 3: Setting Up Data Warehouse Connections
Data warehouse connections power your ability to execute dbt™ models and transform data. Paradime supports multiple connection types to accommodate different environments and workflows.
Initial Connection Configuration
During workspace onboarding, you'll add your first data warehouse connection. This connection enables developing and running dbt™ models directly through the Paradime IDE. The setup process varies slightly depending on your warehouse provider, but generally involves providing connection credentials, selecting the appropriate authentication method, and testing the connection to ensure everything works correctly.
Supported Data Warehouses
Paradime's broad warehouse support means you can use Snowflake, BigQuery, Redshift, or Databricks as your data platform. Each warehouse has specific configuration requirements, but Paradime guides you through the process with clear prompts and validation steps.
Multiple Environment Connections
Professional analytics workflows require separate connections for different purposes. Paradime supports this through distinct connection types:
Bolt Scheduler Connection serves as your production environment. Navigate to account settings, locate the Connections tab, and click "Add New" in the Scheduler section. Select your data warehouse provider, configure the connection details including credentials and target settings, and test the connection before saving. This connection becomes the default target for Bolt schedules running dbt™ in production.
TurboCI Connection powers your continuous integration workflows. Set this up similarly to the Bolt connection, but specify your dbt™ profile name (which must match your dbt_project.yml file) and set the target as "ci". You'll typically use a different schema for CI runs—many teams use "dbt_ci" to keep test runs separate from production data. This connection runs dbt™ with TurboCI on pull requests, validating changes before they reach production.
This separation between development, CI/CD, and production environments ensures that experimental code and tests don't interfere with your production data pipelines. You can switch between environments using the --target argument in dbt™ commands, giving you full control over where your code executes.
Step 4: Managing Workspace Configurations
dbt™ Version Management
Keeping your dbt™ version current and consistent across your team is crucial for avoiding compatibility issues. In Paradime, navigate to account settings, then the Workspace tab, and locate the project settings section to view your current dbt™ version.
To change versions, click the Edit button next to the current version, select your desired version from the dropdown menu, and save. This change applies to all users in the workspace for both the Code IDE and Bolt scheduler, ensuring consistency across development and production environments. Always verify your project's compatibility before upgrading versions, especially when using custom packages or advanced features.
Environment Variables Setup
Environment variables are essential for managing configuration that varies between environments or contains sensitive information. Access them through Settings > Workspaces > Environment Variables.
Paradime provides two distinct contexts for environment variables:
Bolt Schedule Environment Variables are used for production jobs. These require Admin privileges to manage and are injected at runtime when your scheduled jobs execute. This separation ensures that production configurations remain secure and controlled.
Code IDE Environment Variables support development work and are immediately available to developers working in the IDE. These help developers test locally without hardcoding credentials or configuration values.
To add a variable, click "Add New" in the appropriate section, enter your key name and value, and click the Save icon. You can edit or delete existing variables as needed. Remember that variables are environment-specific, maintaining the separation between development and production contexts.
API Keys Management
For programmatic access to Paradime, you'll need API keys. Navigate to account settings, then the Workspace tab, and locate the API key section. Click "+ Generate API Key," provide a descriptive name, and optionally set a lifetime (in days) for automatic expiration—a security best practice for rotating credentials.
After creation, securely store the API key, secret, and endpoint information. Paradime won't display this information again. Define the minimum necessary capabilities for your API key based on its intended use case. API keys are workspace-scoped, meaning they cannot access resources in other workspaces, providing natural security boundaries.
Regularly review your active API keys and rotate them periodically to maintain security. Delete any keys that are no longer in use.
Step 5: Managing Users and Permissions
User Access Management
Inviting team members to your workspace is straightforward, but understanding Paradime's role-based access control ensures everyone has appropriate permissions. All roles except Business, Billing Admin, Security Admin, and Workspace Settings Admin can invite new users to workspaces.
Role-Based Access Control
Paradime offers eight distinct user roles as part of the Security Pack:
Admin provides full access across the platform, including IDE development, Bolt schedule creation, workspace management, and settings configuration.
Billing Admin focuses on plan and billing management without requiring access to development tools.
Security Admin accesses audit logs and security features for compliance and monitoring purposes.
Workspace Settings Admin manages all workspace settings and can create workspaces but cannot access the IDE or other Paradime apps—ideal for platform administrators who don't need development access.
Workspace Admin receives unrestricted access to workspaces, including IDE development, Bolt schedule creation, and workspace management, but within their assigned workspaces only.
Developer has unrestricted access to Paradime apps, can develop using the IDE and create Bolt schedules, but cannot create workspaces or manage platform-level settings.
Analyst can access Paradime apps and develop using the IDE but cannot create Bolt schedules, workspaces, or manage settings—perfect for team members who write and test code but don't deploy to production.
Business provides read-only access to workspaces, enabling stakeholders to view lineage, catalogs, and documentation without development permissions.
Team Collaboration Setup
With roles assigned, configure team workflows to match your development process. Developers and Analysts can create commits and push branches, enabling collaborative development. Admins, Workspace Admins, and Developers can create Bolt schedules, establishing clear ownership of production deployments.
Consider setting up notifications and alert preferences through integrations with tools like Slack, PagerDuty, or DataDog to keep your team informed of pipeline status and issues.
Leveraging Paradime Features Post-Setup
DinoAI Co-Pilot
Once your workspace is configured, DinoAI becomes your AI-powered development assistant. It helps with SQL writing by suggesting optimized queries and identifying potential issues. The AI can automatically generate documentation for your models, saving hours of manual work. When refactoring legacy code, DinoAI provides intelligent suggestions for modernizing your models and improving performance.
Paradime Bolt Orchestration
Bolt transforms how you schedule and run production pipelines. Its declarative scheduling approach means you define what should run and when, without complex orchestration code. Configure CI/CD pipelines to automatically test changes on pull requests before they reach production. Set up automated test runs to catch issues early in the development cycle.
Monitoring and Lineage
Paradime's column-level lineage tracking provides unprecedented visibility into your data flows. See exactly where each column originates and how it's transformed through your pipeline. Real-time monitoring keeps you informed of pipeline health, while integration with PagerDuty, DataDog, and Slack ensures the right people are alerted when issues arise.
Impact Analysis
Before merging changes, Paradime analyzes the potential impact on downstream dashboards and reports. This pre-merge dashboard impact analysis prevents breaking changes from reaching production. The system detects modifications that could affect end-users, enabling safe deployment practices and reducing incidents.
Troubleshooting Common Setup Issues
Git Connection Problems
If you encounter deploy key configuration errors, verify that you've added the key to the correct repository and granted write permissions. Repository access issues often stem from insufficient admin privileges—confirm you have the necessary role in your Git platform. For branch and commit permission problems, check that the deploy key has been properly activated in your repository settings.
Data Warehouse Connection Issues
Authentication failures typically indicate incorrect credentials or expired tokens. Double-check your username, password, and any authentication tokens. Network connectivity problems may require your IT team to whitelist Paradime's IP addresses in your firewall. When managing credentials across multiple environments, ensure each connection uses the appropriate credential set for its context.
Configuration Challenges
Environment variable conflicts usually occur when the same variable is defined differently across environments. Review your variable definitions to ensure consistency where needed and intentional differences where required. dbt™ version compatibility issues can be resolved by checking release notes and testing in a development environment before upgrading production. Performance optimization may require adjusting thread counts in your warehouse connections or optimizing your dbt™ models themselves.
Next Steps After Workspace Setup
Developing Your First dbt™ Model
With your workspace configured, you're ready to create your first model in the Paradime IDE. The interface provides code completion, syntax highlighting, and integrated documentation. Create a new SQL file, write your transformation logic, and use the built-in preview functionality to see results immediately. DinoAI stands ready to assist with suggestions and optimizations as you code.
Setting Up Production Workflows
Configure your first Bolt schedule to run models on a recurring basis. Define dependencies between models, set appropriate scheduling intervals, and configure failure notifications. Implement CI/CD pipelines that test every pull request, ensuring only validated code reaches production. Schedule automated test runs to maintain pipeline health and catch regressions early.
Optimizing Team Productivity
Establish development best practices within your team, such as consistent naming conventions, documentation standards, and code review processes. Leverage DinoAI's features to accelerate development and reduce repetitive tasks. Monitor performance metrics through Paradime Radar to identify optimization opportunities and track your team's productivity improvements over time.
With your Paradime workspace fully configured, you have a powerful platform for analytics engineering that combines AI assistance, robust orchestration, comprehensive monitoring, and collaborative development—all designed to help your team deliver better data products faster.


