Introduction
Paradime is an AI-powered workspace for analytics that consolidates your entire analytics workflow into one platform. With features like an intuitive Code IDE, DinoAI co-pilot for writing SQL and generating documentation, and Paradime Bolt for production-grade dbt™ orchestration, teams achieve 50-83% productivity gains and 25-50% faster development cycles. Paradime eliminates tool sprawl and context-switching while providing column-level lineage, native BI integrations, and automated impact analysis—helping you ship data products faster and more reliably.
Setting up a dbt project has traditionally been a time-consuming process involving multiple steps, complex Git operations, and manual configuration. Paradime transforms this experience with purpose-built tools like the Paradime CLI, Git Lite, and DinoAI integration that reduce setup time to just 10 minutes. This comprehensive guide walks you through the complete workflow from Git repository connection to version control, helping your data team get productive faster.
What You Need Before Starting
Before diving into your dbt project setup, ensure you have the following prerequisites in place:
Required Permissions and Access Levels
Admin or developer role in Paradime workspace to create and configure projects
Appropriate permissions to connect and manage Git repositories
Access credentials for your data warehouse
Git Repository Options You can proceed with either:
An existing dbt repository that you want to connect to Paradime
A new repository that you'll create for your project
Both approaches work seamlessly with Paradime's setup workflow, allowing you to choose what best fits your team's needs.
Data Warehouse Connection Paradime requires a connected data warehouse to generate sources and run dbt models. Ensure you have:
Valid credentials for your data warehouse (Snowflake, BigQuery, Redshift, Databricks, etc.)
Network access and permissions to connect from Paradime
Understanding of which databases and schemas you'll be working with
With these prerequisites ready, you can complete the entire setup process in approximately 10 minutes.
Connecting Your Git Repository
Git integration forms the foundation of your dbt project workflow in Paradime. The platform provides comprehensive version control that ensures safe collaboration and code management across your team.
Repository Strategy Selection Your first decision is choosing between an existing dbt repository or creating a new one. If you're migrating an existing project, connecting your current repository preserves your project history and existing structure. For new projects, creating a fresh repository gives you a clean starting point with Paradime's optimized structure.
Git Integration Process To connect your Git repository to Paradime:
Navigate to your workspace settings in Paradime
Select the "Workspace" section from Workspace Settings
Locate the Git Connections area
Click "Edit Repository" or "Add Repository"
Provide your Git repository URL
Configure authentication credentials
Set up repository permissions to enable Paradime access
The connection process is straightforward, and Paradime supports major Git providers including GitHub, GitLab, and Bitbucket. Once connected, your repository becomes the single source of truth for your dbt project code, enabling seamless collaboration with built-in version control.
Initializing Your dbt Project with Paradime CLI
The Paradime CLI is a purpose-built command-line tool that dramatically simplifies dbt project initialization compared to traditional approaches. It automates the creation of project structure, configuration files, and even source generation—tasks that would otherwise require manual setup.
Accessing the Terminal Within the Paradime IDE, you'll find a Terminal panel in the Apps section of the editor. This integrated terminal provides direct access to the Paradime CLI without leaving your development environment. The seamless integration means you can initialize, develop, and deploy all from one interface.
Running 'paradime repo init' The magic happens with a single command:
When you execute this command, Paradime initiates an interactive setup process that:
Automatically creates a new branch called
initialize-dbt-projectPrompts you to name your dbt project (e.g., "demo_project", "analytics", or your company name)
Generates a complete dbt project skeleton with all necessary folders and files
Creates the essential
dbt_project.ymlconfiguration file with proper settingsOffers to generate sources.yml files for your data warehouse
The entire initialization takes less than two minutes, compared to 15-20 minutes of manual setup with traditional dbt core.
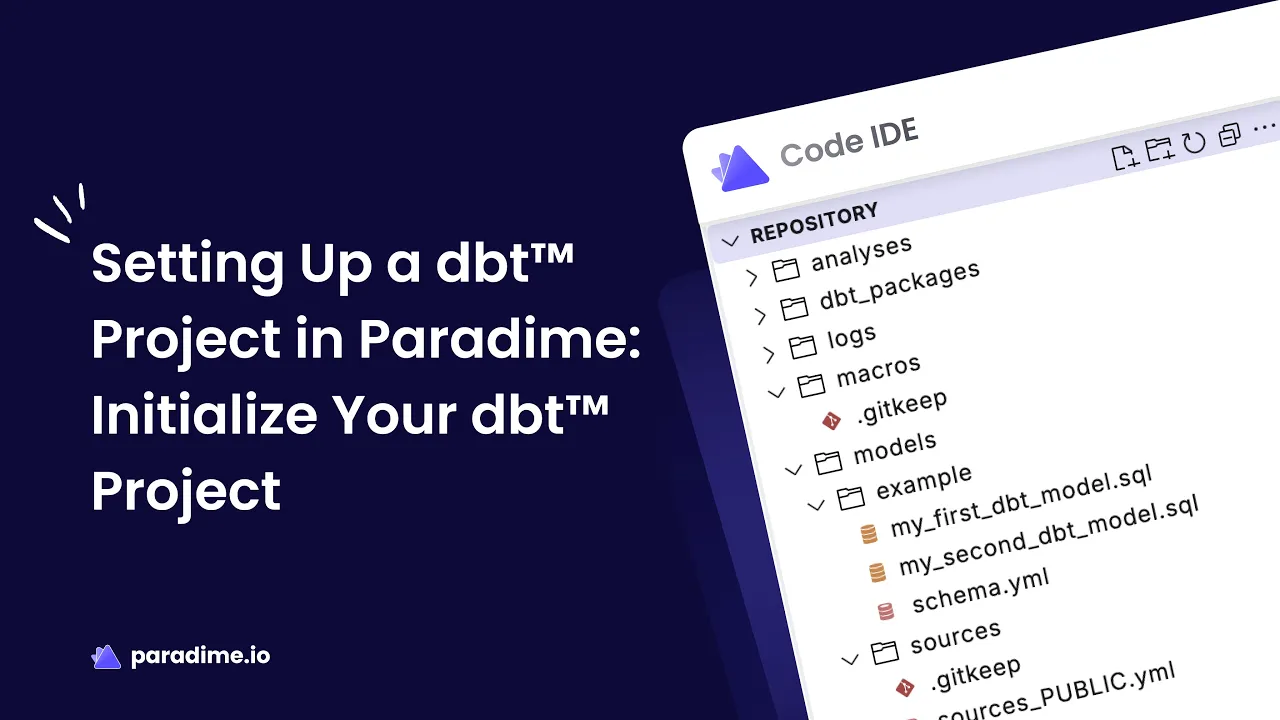
Understanding the Generated Structure Paradime creates a standard dbt project structure that includes:
models/directory for your SQL transformationstests/directory for data quality testsmacros/directory for reusable SQL functionsseeds/directory for CSV filessnapshots/directory for Type 2 slowly changing dimensionsdbt_project.ymlas your main configuration file
This structure follows dbt best practices and gives you a solid foundation to start building your analytics transformations immediately.
Generating Sources for Your Data Warehouse
Sources in dbt define the raw tables in your data warehouse that serve as inputs to your transformations. Rather than referencing tables directly, dbt sources provide a layer of abstraction that enables documentation, freshness checks, and lineage tracking.
Automatic Source Generation One of Paradime's most powerful time-saving features is automatic source generation. During the paradime repo init process, Paradime prompts you to generate sources:
Select Your Database: Paradime automatically fetches all available databases from your connected data warehouse and displays them as options. Use arrow keys to navigate and press Enter to select.
Choose Relevant Schemas: After selecting a database, Paradime displays all available schemas. You can select multiple schemas using the arrow keys, pressing
>to select each one, then pressing Enter to confirm.Automatic File Generation: Paradime generates a properly formatted
sources.ymlfile for each schema using the naming conventionsources_.yml. These files include all tables within the selected schemas with correct configuration.
This automated process eliminates the tedious manual work of writing source definitions, reducing potential errors and saving 10-15 minutes per schema.
Alternative: DinoAI Source Generation If you skip source generation during initialization or need to add sources later, DinoAI offers an alternative approach. Simply ask DinoAI to "Create sources from my warehouse" and specify which databases and schemas you need. DinoAI will generate properly formatted source files that you can review and customize.
Understanding Sources.yml Structure Generated source files include:
Source name and database configuration
Table definitions with proper naming
Schema documentation placeholders
Column references ready for documentation
This structure provides immediate value while allowing you to enhance with descriptions, freshness checks, and custom configurations as your project matures.
Version Control and Collaboration with Git Lite
Paradime's Git Lite feature transforms version control from a complex technical process into an intuitive workflow designed specifically for data teams. Many analytics professionals find traditional Git operations intimidating, but Git Lite abstracts away the complexity while maintaining best practices.
Understanding Git Lite Features Git Lite provides a purpose-built Git workflow that keeps you in sync with your main branch automatically. Key features include:
Automatic Branch Management: Create new branches directly from the remote main/master branch with a single click. The branch list updates automatically every 30 minutes, with manual refresh options available.
Automatic Sync: Git Lite checks if your branch is behind the remote branch or main/master after each commit, manual refresh, or branch switch. It automatically pulls and merges changes to keep you current.
Streamlined Commit Process: Review changed files, enter a commit message, and click "Commit and Push." Git Lite handles the rest—committing with your message, pushing to the remote branch, and merging any remote changes if your branch was behind.
Committing Your Initialization Changes After running paradime repo init, you'll have a complete project structure ready to commit:
Navigate to the Git Lite panel in your IDE
Review the changed files (you'll see your new project structure)
Enter a commit message or use DinoAI's "Write Commit" feature
Click "Commit and Push"
Git Lite automatically handles the commit, push, and any necessary merge operations in the background.
Using DinoAI's 'Write Commit' Feature DinoAI's commit message generation is one of the platform's most popular features. Instead of writing commit messages manually, click "Write Commit" and DinoAI analyzes your code changes to generate a detailed, descriptive commit message automatically. This ensures consistent, informative commit history without the cognitive overhead of crafting messages yourself.
The AI-generated messages typically include:
Summary of files added, modified, or deleted
Explanation of major changes
Context about the purpose of the changes
Creating and Managing Pull Requests Once you've committed your initialization changes:
Ensure all changes are committed (the branch must be "clean")
Click "Open Pull Request" in the Git Lite panel
You'll be directed to your Git provider's interface
Add a description, assign reviewers, and create the PR
Team members can review changes and provide feedback
Paradime's Git Lite ensures your branch is up-to-date before allowing PR creation, reducing merge conflicts and integration issues.
Merging to Main Branch After your team reviews and approves the pull request:
Merge the PR in your Git provider interface
Switch back to the main branch in Paradime
Git Lite automatically pulls the latest changes
Your initialized project is now in the main branch and ready for development
The entire version control workflow—from initialization through merge—takes just a few minutes with Git Lite's automation.
Optimizing Your Setup Process
Time-Saving Features That Make Paradime Different Traditional dbt project setup involves multiple tools, manual configuration, and numerous opportunities for errors. Paradime consolidates this process into a single 10-minute workflow by:
Paradime CLI Automation: The
paradime repo initcommand handles project structure, configuration files, and initial setup automaticallyAutomatic Source Generation: Eliminates manual source.yml creation by pulling metadata directly from your data warehouse
DinoAI Assistance: Provides AI-powered help for commit messages, source generation, and configuration questions
Git Lite Integration: Simplifies version control with automatic syncing and streamlined workflows
Integrated Terminal: Eliminates context-switching between multiple tools and interfaces
These features combine to reduce setup time from 30-45 minutes (traditional approach) to just 10 minutes.
Common Setup Challenges and Solutions
Connection Issues If you encounter data warehouse connection problems:
Verify your credentials are correct and have appropriate permissions
Check network access and firewall rules
Ensure your connection uses the correct host, port, and authentication method
Test the connection using the "Test Connection" button in workspace settings
Initialization Errors If paradime repo init encounters issues:
Ensure your Git repository is properly connected to Paradime
Verify you have write permissions to the repository
Check that your workspace has a valid data warehouse connection
Review the terminal output for specific error messages
Git Integration Problems For Git-related challenges:
Confirm your Git provider credentials are current and valid
Verify repository permissions allow Paradime to create branches and commits
Check that your repository URL is correct and accessible
Ensure your Git provider's API access is enabled
Most issues resolve quickly with Paradime's detailed error messages and comprehensive documentation.
Next Steps After Setup
Building Your First dbt Model With your project initialized, you're ready to create transformations. Start by:
Creating a new SQL file in the
models/directoryReferencing your sources using the
{{ source() }}functionWriting SELECT statements to transform your raw data
Running
dbt runin the Terminal to build your models
Paradime's Code IDE provides syntax highlighting, auto-completion, and instant feedback to accelerate development.
Leveraging DinoAI Capabilities DinoAI offers powerful assistance beyond commit messages:
Generate dbt models from natural language descriptions
Create tests and documentation automatically
Explain complex SQL logic
Suggest optimization opportunities
Answer dbt and analytics engineering questions in context
Think of DinoAI as a pair programming partner that understands both SQL and dbt best practices.
Setting Up Paradime Bolt for Orchestration Once you have models built, configure Paradime Bolt for production-grade orchestration:
Define schedules for your dbt runs
Set up dependencies between jobs
Configure alerts for failures
Enable TurboCI for fast CI/CD testing
Paradime Bolt provides enterprise orchestration without the complexity of external tools like Airflow.
Establishing Team Collaboration Best Practices For successful team adoption:
Define branch naming conventions
Establish code review requirements
Document your data warehouse schemas and sources
Set up automated testing standards
Create guidelines for model organization
Paradime's built-in collaboration features support these practices with automated workflows, integrated documentation, and seamless team coordination.
By following this guide, you've reduced dbt project setup from a complex, multi-tool process to a streamlined 10-minute workflow. Paradime's combination of the Paradime CLI, Git Lite, and DinoAI integration eliminates traditional pain points while establishing best practices from day one. Your data team can now focus on building valuable transformations rather than wrestling with configuration and tooling—exactly what modern analytics engineering should be.


